View page in desktop
|
Report error
  •   Apple app store icon
  • Google play store icon
Terms of Service
|
Privacy Policy
|
PDPA
|
Site Map
|
Whistleblowing Portal
©2004-2026 Sgcarmart, Singapore. All rights reserved.
  • Home
  • Car Articles
  • advice
  • advice Listings
  • Car Maintenance Advice

Waxing your car yourself - A DIY guide

01 Sep 2007

|

51,694 views

Waxing your car involves placing a transparent barrier between the environment and paintwork in order for the shine to last.


Waxing your car involves placing a transparent barrier between the environment and paintwork. Exposure to adverse conditions causes your paint to look dull and old. Pure waxes coat paintwork with a protective layer and do not remove defects such as scratches and marks. This is the reason why claying and polishing have to be performed before waxing to ensure a smooth surface. Waxing a dirty car without the two leads to the sealing of dirt and grime.

While some car owners wax their cars to obtain the glossy finish, others wax their cars as a precaution against car paint contaminants. Whichever the reason, waxing is important as long as you have a car.

Difference between Polishes, Waxes and Sealants

There is a distinctive difference between these 3 products that all those interested in detailing should know.

A polish removes flaws that are below the paint surface. They are abrasive, and will eat into the paintwork in order to remove the imperfections.

Waxes are the traditional, natural, protection for cars. Most car waxes use carnauba as their main component. It is nature's hardest, purest and most transparent wax. Carnauba car waxes tend to produce a deeper, darker, richer shine that is often described as "three-dimensional."

Paint sealants are synthetic waxes that serve the same purpose of protecting the car paintwork. They are made of polymer or acrylic resins and are known to offer excellent durability and ease of application. However, many feel that paint sealants lack the depth and richness of colour that natural waxes provide. Car owners with little detailing experience should not use paint sealants as they are difficult to buff off.

Carnauba Wax


How to wax

Before waxing your car, always make sure that the surface is clean is contaminant-free. The process of claying and polishing ensures this.

For those who feel confident about using the paint sealant, apply the sealant before waxing the car. After you have applied the paint sealant and buffed off the residue, allow 8 hours for the sealant to dry. This resting time called curing, will ensure that the sealant bonds to the paintwork for a lasting protection. Multiple layers of sealant should be used before waxing. This ensures that your sealant can last for about 6 months. Curing time is still necessary between coating the layers of sealant, therefore several days might be needed to coat the car.

Follow the steps below for the application of the wax.

Before you start, do note that you should not try to make your job easier by putting a huge amount of wax with the thought that less waxing will be required- it doesn't work.You'll end up with an excessive amount of wax residue to remove which makes the job more difficult.

1)Work in a shaded area out of direct sunlight.
2)Use a foam applicator pad to apply your wax. If the applicator becomes caked with wax, switch to a fresh applicator.
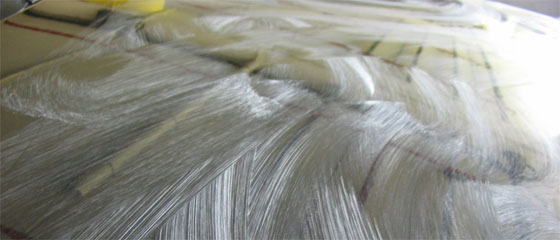
3)Work on one area at a time covering 2 to 4 square feet. Use a small amount of wax at each area. Using too much wax will result in a waste of time and product. Apply your wax in a back-and-forth motion, not in circles. If you are creating swirls, you need to replace your applicator or towels.
4)Allow the wax to haze before buffering it off. For inexperienced car owners, hazing refers to area becoming cloudy. This means that the wax has dried and you should wipe it off. This takes no longer than 5 minutes. Allowing the wax to haze for too long makes it difficult to buff off.
5)Wipe off the wax using only a very soft clean microfibre cloth. This process is called buffing, and you should see a shiny surface after doing it. You should not wax your entire car before buffing off the wax as it would have dried up too much . Always wax and buff off the wax in sections. One good way would be to divide your car into 7 sections.
6)Finally, remove the wax residue from the various edges. The edges of the doors, trunk and hood are easy- simply go over the area with the cloth. Fixed items, such as side marker lights, badges, radio antennas, windshield washer nozzles, etc. are more difficult. You can use a soft bristled toothbrush, but be careful as scratches can occur if you brush too hard. A toothpick can also be effective sometimes although its slower. After waxing, your car's paint should feel slick and smooth, free of streaks and smudges.

Avoid applying excessive amount of wax. You are only wasting it as only a thin layer will bond to your paintwork.


Is it necessary to apply a few layers of wax

As with sealants, most waxes can also be applied in a few layers to improve its protection and to create maximum gloss. It is not recommended for you to wax a few layers on your car in one single detailing session as a curing time of 12 to 48 hours is needed for each layer of wax to bond onto the car paintwork.

Layering of the wax should be done once a month. Wash and wax your car every month without performing the polishing and claying steps so as not to remove the residue wax from the previous detailing session.

Layering of the wax will ensure the uniform, thorough coverage over the majority of the surface, thus maximizing the protection. Note that applying of more layers of wax may not necessarily improve the shine on your car.

Also read

•Starters guide to bringing the shine to your paintwork
•Guide to claying your car
•Guide to polishing your car
AllReviewsNewsAdviceFeaturesVideos
  • Home
  • Car Articles
  • advice
  • advice Listings
  • Car Maintenance Advice

Waxing your car yourself - A DIY guide

01 Sep 2007

|

51,694 views

Waxing your car involves placing a transparent barrier between the environment and paintwork in order for the shine to last.


Waxing your car involves placing a transparent barrier between the environment and paintwork. Exposure to adverse conditions causes your paint to look dull and old. Pure waxes coat paintwork with a protective layer and do not remove defects such as scratches and marks. This is the reason why claying and polishing have to be performed before waxing to ensure a smooth surface. Waxing a dirty car without the two leads to the sealing of dirt and grime.

While some car owners wax their cars to obtain the glossy finish, others wax their cars as a precaution against car paint contaminants. Whichever the reason, waxing is important as long as you have a car.

Difference between Polishes, Waxes and Sealants

There is a distinctive difference between these 3 products that all those interested in detailing should know.

A polish removes flaws that are below the paint surface. They are abrasive, and will eat into the paintwork in order to remove the imperfections.

Waxes are the traditional, natural, protection for cars. Most car waxes use carnauba as their main component. It is nature's hardest, purest and most transparent wax. Carnauba car waxes tend to produce a deeper, darker, richer shine that is often described as "three-dimensional."

Paint sealants are synthetic waxes that serve the same purpose of protecting the car paintwork. They are made of polymer or acrylic resins and are known to offer excellent durability and ease of application. However, many feel that paint sealants lack the depth and richness of colour that natural waxes provide. Car owners with little detailing experience should not use paint sealants as they are difficult to buff off.

Carnauba Wax


How to wax

Before waxing your car, always make sure that the surface is clean is contaminant-free. The process of claying and polishing ensures this.

For those who feel confident about using the paint sealant, apply the sealant before waxing the car. After you have applied the paint sealant and buffed off the residue, allow 8 hours for the sealant to dry. This resting time called curing, will ensure that the sealant bonds to the paintwork for a lasting protection. Multiple layers of sealant should be used before waxing. This ensures that your sealant can last for about 6 months. Curing time is still necessary between coating the layers of sealant, therefore several days might be needed to coat the car.

Follow the steps below for the application of the wax.

Before you start, do note that you should not try to make your job easier by putting a huge amount of wax with the thought that less waxing will be required- it doesn't work.You'll end up with an excessive amount of wax residue to remove which makes the job more difficult.

1)Work in a shaded area out of direct sunlight.
2)Use a foam applicator pad to apply your wax. If the applicator becomes caked with wax, switch to a fresh applicator.
3)Work on one area at a time covering 2 to 4 square feet. Use a small amount of wax at each area. Using too much wax will result in a waste of time and product. Apply your wax in a back-and-forth motion, not in circles. If you are creating swirls, you need to replace your applicator or towels.
4)Allow the wax to haze before buffering it off. For inexperienced car owners, hazing refers to area becoming cloudy. This means that the wax has dried and you should wipe it off. This takes no longer than 5 minutes. Allowing the wax to haze for too long makes it difficult to buff off.
5)Wipe off the wax using only a very soft clean microfibre cloth. This process is called buffing, and you should see a shiny surface after doing it. You should not wax your entire car before buffing off the wax as it would have dried up too much . Always wax and buff off the wax in sections. One good way would be to divide your car into 7 sections.
6)Finally, remove the wax residue from the various edges. The edges of the doors, trunk and hood are easy- simply go over the area with the cloth. Fixed items, such as side marker lights, badges, radio antennas, windshield washer nozzles, etc. are more difficult. You can use a soft bristled toothbrush, but be careful as scratches can occur if you brush too hard. A toothpick can also be effective sometimes although its slower. After waxing, your car's paint should feel slick and smooth, free of streaks and smudges.

Avoid applying excessive amount of wax. You are only wasting it as only a thin layer will bond to your paintwork.


Is it necessary to apply a few layers of wax

As with sealants, most waxes can also be applied in a few layers to improve its protection and to create maximum gloss. It is not recommended for you to wax a few layers on your car in one single detailing session as a curing time of 12 to 48 hours is needed for each layer of wax to bond onto the car paintwork.

Layering of the wax should be done once a month. Wash and wax your car every month without performing the polishing and claying steps so as not to remove the residue wax from the previous detailing session.

Layering of the wax will ensure the uniform, thorough coverage over the majority of the surface, thus maximizing the protection. Note that applying of more layers of wax may not necessarily improve the shine on your car.

Also read

•Starters guide to bringing the shine to your paintwork
•Guide to claying your car
•Guide to polishing your car
Andy Hum
Text and photos by Andy Hum
Writing may be my thing, but cars, well, that's just pure passion that I simply cannot get rid off.
24.4k

Tags

guide to waxing your car waxing your car car wax car waxing guide to car waxing wax car guide to wax your car wax your car car grooming

Andy Hum
Text and photos by Andy Hum
Writing may be my thing, but cars, well, that's just pure passion that I simply cannot get rid off.
24.4k

Tags

guide to waxing your car waxing your car car wax car waxing guide to car waxing wax car guide to wax your car wax your car car grooming

All Advice Categories

Car BuyingCar SellingCar OwnershipCar TechnicalCar MaintenanceMiscellaneous

All Advice Categories

Car BuyingCar SellingCar OwnershipCar TechnicalCar MaintenanceMiscellaneous

Related Motor Directory Categories

    Repair & ServicingCar Grooming - Wash & PolishAir ConditioningSpecialty WorkshopsCommercial Vehicle WorkshopsTransmission & Gearbox

Related Motor Directory Categories

    Repair & ServicingCar Grooming - Wash & PolishAir ConditioningSpecialty WorkshopsCommercial Vehicle WorkshopsTransmission & Gearbox

Related Articles

Jaecoo 8 Plug-in Hybrid Review

Jaecoo 8 Plug-in Hybrid Review

VINCAR Group to distribute Jetour in Singapore

VINCAR Group to distribute Jetour in Singapore

BYD Sealion 8 DM-i Review

BYD Sealion 8 DM-i Review

IM5 Electric Luxury Review

IM5 Electric Luxury Review

Editorial Picks: Electric crossovers below $170k

Editorial Picks: Electric crossovers below $170k

Sgcarmart Explores: Bras Basah!

Sgcarmart Explores: Bras Basah!

iCaur V23 100kW Review

iCaur V23 100kW Review

Tesla Model 3 Facelift Review

Tesla Model 3 Facelift Review

You May Also Like

Sgcarmart Explores: Bras Basah!

Sgcarmart Explores: Bras Basah!

New cars are safer: Opt for one when you can

New cars are safer: Opt for one when you can

Leapmotor B10: The electric SUV focused on what matters

Leapmotor B10: The electric SUV focused on what matters

Tesla Model 3 Facelift Review

Tesla Model 3 Facelift Review

The rise of PHEVs: A closer look at the numbers

The rise of PHEVs: A closer look at the numbers

The all new XPENG Mona L03 is one smart coupe SUV

The all new XPENG Mona L03 is one smart coupe SUV

Cars of 2026

Cars of 2026

Sgcarmart Explores: East Coast Park!

Sgcarmart Explores: East Coast Park!

BYD Atto 3 Evo Facelift Review

BYD Atto 3 Evo Facelift Review

Multi-Pathway approach: Toyota was always right

Multi-Pathway approach: Toyota was always right

Kia Niro Hybrid Facelift Review

Kia Niro Hybrid Facelift Review

Lexus ES350h Hybrid Review

Lexus ES350h Hybrid Review

Mercedes-Benz GLC Electric Review

Mercedes-Benz GLC Electric Review

Don't get yourself trapped in your high-tech EV

Don't get yourself trapped in your high-tech EV

Hongqi Singapore opens its showroom doors

Hongqi Singapore opens its showroom doors

The 5 main things you must know about the XPENG L03

The 5 main things you must know about the XPENG L03